


-
- By Irena Macri
- | Published:
- | Updated:
- | 0 Comments
- | ★ Leave a review

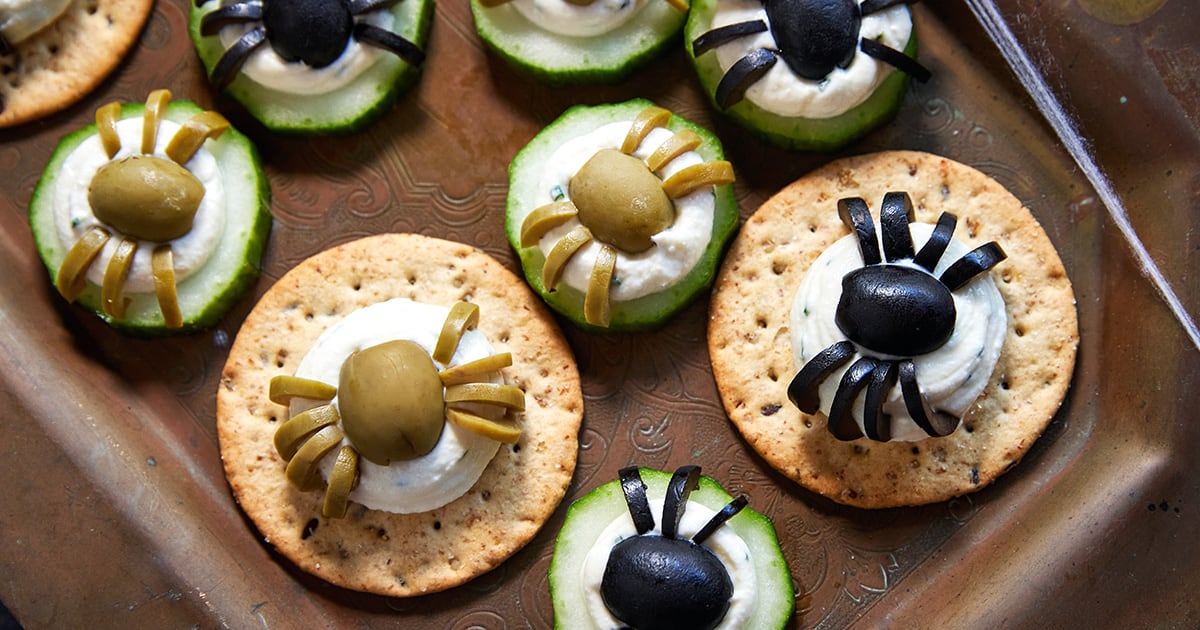
Creamy whipped cheese piped onto crackers and cucumber, topped off with little olive spiders. It’s the easiest Halloween finger food on my table every year, and it takes about 30 minutes.
Spider Bites At A Glance
- ⏱ Ready In: 20-30 minutes (no cooking required)
- 🍽 Serves: 16 bites (plus extra dip left over, you can make more bites)
- 🌱 Diet: Vegetarian, gluten-free option (use GF crackers), low-carb option (use cucumber only)
- 💪 Nutrition Highlights: A good hit of protein from the feta, cream cheese, and yogurt
- 🧀 Main Ingredients: Cream cheese, feta, Greek yogurt, chives, black and green olives
- 🔥 Flavor Profile: Creamy, salty, garlicky, with a fresh chive lift and briny olive bite
- 🧊 Meal-Prep Friendly: Whipped base keeps 3 days in the fridge; assemble just before serving
- Best Served With: A Halloween grazing board, extra crackers, veggie sticks, or a bowl of the dip on the side
I made these last October when I needed something quick for a Halloween get-together and didn’t want to cook; this year I finally shot the recipe for the blog. The base is just whipped cream cheese, feta, and a little yogurt with chives and a little garlic, so it comes together very quickly.
To make it a real Halloween finger food, I make creepy spiders out of sliced olives to pop on top. It looks fiddly in photos, but it’s genuinely one of those “took longer to explain than to make” recipes. I like doing a mix of black and green olive spiders on the tray; it looks more interesting than one color and gives you a reason to use up whatever olives are in the fridge. The leftover whipped mixture goes in a bowl on the side as a dip, so nothing gets wasted if you make more than you need for the crackers.
👩🍳 You might also like these Halloween recipes:
→ Halloween Spider Web Pumpkin Tart
→ Pumpkin Deviled Eggs
→ Spooky Mozzarella Balls
→ Puff Pastry Pizza Mummies
→ Halloween Brownies
→ Best Halloween Food Ideas (Savory)
→ Halloween Desserts & Treats
→ Best Fall Sangria Recipes
What You’ll Need
Here is what you’ll need for this whipped cheese spider bites recipe. Find the full measurements in the recipe card below.
- Cream cheese — softened, this is the base that makes the mixture rich and pipeable. Full-fat gives the best texture, but light works too.
- Feta — crumbled, brings the salty tang. Greek or a smooth Danish-style feta both work well.
- Greek yogurt — lightens the mixture and adds a bit of protein without watering it down.
- Fresh chives — folded in by hand at the end so they stay as distinct flecks instead of turning the whole mixture green.
- Garlic — optional, just a small clove for a background note. Leave it out if you’d rather keep it simple.
- Salt and pepper — go easy at first, since feta and garlic can both vary a lot in strength.
- Round crackers and cucumber slices — the base for each bite. Cut cucumber into rounds about 1 cm thick so they can hold a decent dollop without collapsing.
- Black and green pitted olives — these become the spiders. A mix of both colors looks great on a platter and isn’t any extra effort.
How To Make Whipped Cheese Spider Bites
Find the full recipe and nutritional information below. Here are some handy step-by-step photos for how to make these spider bites.
- Combine the cream cheese, feta, yogurt, and garlic (if using) in a bowl or food processor.
- Whip with a hand mixer, stick blender or food processor for about a minute, until completely smooth and thick enough to hold its shape when piped.
- Taste before adding salt, since feta and garlic strength varies a lot between brands.
- Fold in the chives by hand so they stay as distinct flecks rather than getting bruised by the mixer. Taste again and adjust the seasoning.
- Transfer the mixture to a piping bag, or a Ziploc bag with the corner snipped off.
- Pipe or spoon a generous dollop onto each cracker and cucumber slice.
- For each spider, place one olive slice in the center of the dollop as the body, then fan out thin olive slivers on either side as the legs.
- Arrange on a platter, scatter a few extra spiders or spooky decorations around, and serve chilled with the remaining whipped mixture in a bowl on the side as a dip.
Watch The Video
Recipe Tips
- Mix your olive colors. Doing some spiders in black olives and some in green breaks up the platter and looks far more interesting than one color alone.
- Slice the legs thin. A sharp paring knife gives you the thinnest, most spider-like legs. Cut a few extra slivers, since some will break.
- Don’t over-whip after adding chives. Fold them in by hand so the mixture doesn’t turn green, and the chives stay as visible flecks.
- Make the base ahead. The whipped mixture keeps well in the fridge for up to 3 days. Assemble the crackers and cucumber close to serving so they don’t go soggy.
- Cucumber vs crackers. Cucumber slices keep this lower-carb and gluten-free; crackers hold up a bit better if the platter is sitting out for a while.
Serving Suggestions
These are built for a Halloween grazing table, so I like putting them next to a few other spooky bites and letting people help themselves. Extra crackers or veggie sticks on the side make sense of the leftover dip, and a scattering of plastic spiders or a bit of cobweb decoration around the tray goes a long way for very little effort. As far as Halloween finger food goes, this is one of the few that holds up at room temperature for a couple of hours without looking sad.
Want to Save This Recipe?
Enter your email & I’ll send it to your inbox. Plus, get great new recipes from me every week!
By submitting this form, you consent to receive emails from Cooked & Loved
A whipped cream cheese and feta spread with chives and garlic, piped onto crackers and cucumber slices and topped with an olive spider. Comes together in about 30 minutes with no cooking required. Find step-by-step photos below and more recipe tips above.
-
In a bowl or food processor, combine the cream cheese, feta, yogurt, and garlic.
-
Whip with a hand mixer, stick blender, or food processor for about a minute, until smooth, light, and thick enough to hold its shape when piped.
-
Taste before adding salt, as feta and garlic strength can vary.
-
Fold in the chives by hand so they stay as flecks rather than getting bruised by the mixer. Taste again and season with salt and pepper.
-
Transfer to a piping bag (or a zip-top bag with the corner snipped off).
-
Pipe or spoon a generous dollop onto each cracker and cucumber slice.
-
For each spider, place one olive slice in the center of the dollop as the body, then fan thin olive slivers out on either side as the legs.
-
Arrange on a platter and serve chilled, with the remaining whipped mixture in a bowl on the side as a dip.
Key Recipe Tips: Slice olive legs thin with a sharp paring knife for the best spider shape, and fold chives in by hand at the end rather than mixing them through.
Storage Tips: The whipped base keeps in an airtight container in the fridge for up to 3 days. Assemble on crackers and cucumber just before serving.
Make-Ahead Tips: Make the whipped mixture and slice the olive spider legs a day ahead, then assemble the bites on the day.
FAQs:
- Can I make these ahead of time? The whipped base can be made a day or two ahead, but assemble the crackers and cucumber close to serving so they don’t get soggy.
- What can I use instead of feta? Cream cheese alone will work in a pinch, though you’ll lose some of the tang.
- How do I slice the olive spider legs? Cut a pitted olive in half, use one half as the body, then thinly slice the other half (and a spare olive if needed) into slivers for legs.
- Is this gluten-free? Yes, if you swap the crackers for cucumber slices or a gluten-free cracker.
Calories: 90kcal | Carbohydrates: 6g | Protein: 3g | Fat: 6g | Saturated Fat: 3g | Polyunsaturated Fat: 0.4g | Monounsaturated Fat: 2g | Trans Fat: 0.02g | Cholesterol: 15mg | Sodium: 284mg | Potassium: 228mg | Fiber: 1g | Sugar: 3g | Vitamin A: 309IU | Vitamin C: 5mg | Calcium: 73mg | Iron: 0.5mg
More Appetizers You Might Like Recipes

By Irena Macri
About the author:Hi, I’m Irena Macri. I share delicious recipes that I have cooked and loved. I am a published cookbook author, have been food blogging for over 10 years and have a Diploma in Nutrition. You will find many healthy recipes as well as my favourite comfort food. More about me here | Subscribe to my newsletter and freebies
